How to remove background from image
Remove a background from an image without wrecking the edges: where automatic cutout wins, where hair and fur break it, and how to spot a bad result.
 BackGone Team
Removing a background is easy until it isn't. On a studio shot with a clean backdrop, one click is genuinely enough. On flyaway hair, pet fur, or a white shirt against a white wall, every automatic tool produces the same artefact: a halo where the subject meets whatever background you paste it onto.
This guide is the process we use ourselves, including the cases where we tell people not to bother.
First: can this photo be cut out at all?
Two minutes of checking saves an hour of masking. Look at four things before you touch any tool:
- Subject against background. Is there a colour or brightness difference between the edge of your subject and what is behind it? White shirt on a white wall is the classic failure; a dark jumper on a light wall is easy.
- How much of the frame the subject fills. A person who occupies half the frame keeps far more edge detail after any resize than a person in a wide shot.
- Transparent or sheer material. Veils, glass, smoke and plastic bags contain pixels that are partly subject and partly background. Most tools output a hard 0-or-255 edge, so these areas turn solid.
- Resolution. You need enough pixels across the subject, not a big file. A 12MP photo where the face is 200 pixels wide will look worse than a 6MP photo where the face is 800 pixels wide.
If you already have the photo and want the numbers — shape, minimum pixels, file size, background direction — our free checker compares it against the official rules for the country you are applying to and tells you plainly which checks it cannot run.
Three routes, and where each one breaks
Automatic cutout (what we do)
- Wins when
- Edge and background differ, subject fills much of the frame, hair is a small share of the outline
- Breaks when
- Sheer fabric, hair the same colour as the background, subject cropped by the frame edge
- Cost
- Seconds to about half a minute
Manual masking in any editor
- Wins when
- You need one perfect image, or the background must stay partly visible (glass, motion blur)
- Breaks when
- You have 200 product photos. Also: the fringe problem — a 1-pixel ring of the old background survives around the subject
- Cost
- 10 minutes to an hour per image
Reshoot on a better background
- Wins when
- You still have the product or the person, and you need many images
- Breaks when
- The photo is the only record of the moment — a one-off event, a client-supplied shot
- Cost
- Minutes if you have a plain wall and daylight
The third row is the one people skip. If you can reshoot, a plain wall and indirect daylight beats an hour of masking, every time.
The hair problem, and how to look at it
Hair is the hardest edge because it is the only place where the "edge" is wider than one pixel. A single curl that is three pixels wide at the root and translucent at the tip is a mix of subject and background in the same pixel. An automatic cutout has to guess: keep it (and the background leaks in), or drop it (and the hair looks chopped).
Two of the hardest cases we test with — voluminous curls and long fur — processed by the production engine:


Curls at the outline: the strands are kept, and the background between them is not.

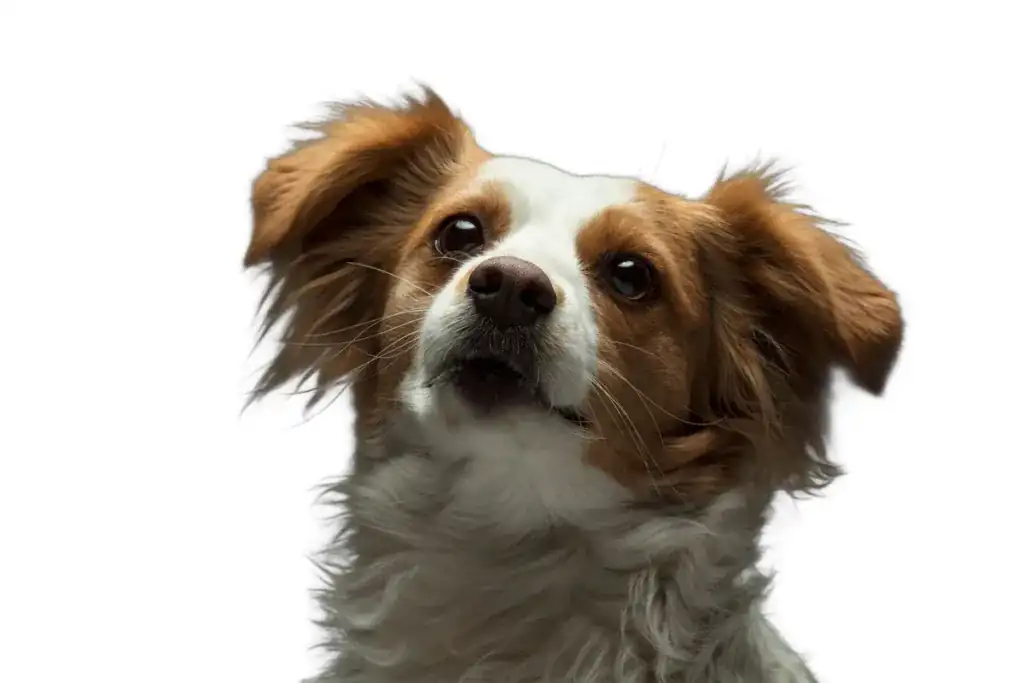
Long fur: white hair against a darker surface, which is the easy direction. Reverse it — white fur on a white floor — and no automatic tool we know of gets it right.
How to inspect an edge properly. Never judge a cutout against a white background, because a white halo is invisible there. Paste the result onto saturated magenta and look at the outline at 200%. What you are looking for:
- A halo — a bright or coloured ring. It is leftover background, and it is the single most common defect.
- Colour spill — the subject's edge has taken the background's colour (green edges from grass, blue from a wall). Look at the hand, the jawline, the hair tips.
- Choppy edges — where fine detail was removed in blocks instead of strands.
What actually goes wrong in practice
Four failure modes, in the order we see them:
- The cutout is transparent but empty. Some images fail "successfully": you get a valid PNG with the correct dimensions and nothing in it. It happens with very low-contrast inputs. The tell is file size — an empty result is roughly 0.004 bytes per pixel, while a real cutout of a person is around 0.55 bytes per pixel. Open it against a coloured background before you ship it; a 12MP image under 100 KB is usually empty.
- The edge is hard because the source was soft. If the original was shot with a shallow depth of field, the outline of the subject is blurred across several pixels and belongs partly to the background. Sharpening after the cutout only moves the halo around.
- Resolution promises that do not survive. We measured our own engine on single runs: 6MP took about 17s, 12MP about 13s, 24MP about 18s, and 50MP about 33s with a 16.4MB output. Cost and risk scale with pixels while visible quality usually does not: for anything that ends up on screen at 2000 pixels wide, resizing the longest side to about 3000 pixels before upload is the cheapest quality decision you will make all day.
- Format. A cutout needs an alpha channel, so the output has to be PNG or WebP. Saving a cutout as JPEG silently fills the transparent area with white, and many print shops and upload forms reject a photo with a transparent background anyway.
A six-point check before you use the result
- Paste it on magenta, not white, and look at the outline at 200%.
- Confirm the file is not suspiciously small (empty result) — open it, do not trust the thumbnail.
- Check the hairline, jawline and hands: the three places spill shows first.
- Zoom to a single strand: does the edge hold up, or does it break into blocks?
- Confirm the format has alpha (PNG-24/WebP), and that any upload form asking for a plain background gets one.
- Look at the image at the size it will actually be used. Most halo complaints disappear at 800 pixels wide; most blocky-edge complaints appear only at 100%.
When to reshoot instead
Reshoot when the background can be controlled and the subject still exists — a plain wall, the subject a metre away from it, indirect daylight, no flash. It is faster than masking, and the result is genuinely clean rather than nearly clean.
Do not reshoot a photo that documents a moment (an event, a person who is not available) and do not reshoot a client's supplied image. For those, budget the manual route, or accept the automatic result and fix only the edge that matters.
What this means for us
We publish our measurements rather than a claim that the cutout is perfect, because it is not: sheer fabric and white-on-white are still hard, and we say so on the tool page. Where the tool is right is the ordinary case — a subject with a distinguishable edge, at a sane resolution — and the checker is there to tell you when your photo is outside that case before you spend time on it.
The order we use is: get the official requirements first, then cut the photo out. The country size pages carry the numbers with their government sources and the date we last checked each one, the checker tests a photo you already have, and the tool makes the compliant version.